The Epoxy Floor Installation Process Toronto and GTA Homeowners Can Finally See From Start to Finish
- SurfacePro Epoxy Flooring Team
- 3 minutes ago
- 20 min read

Summary: Most epoxy flooring companies show you the before and after. SurfacePro Epoxy Flooring is showing you everything in between. This is the complete six-step professional epoxy floor installation process we use on every residential and commercial project across Toronto, Markham, Vaughan, Richmond Hill, Scarborough, Mississauga, Brampton, Ajax, Pickering, and the entire GTA. Every step, every reason behind it, and exactly what it means for the floor you end up with. Because a floor that lasts 15 to 20 years through Ontario winters does not happen by accident. It happens because of this process, executed correctly, every single time.

Why the Epoxy Floor Installation Process Matters More Than the Product
If you have been researching epoxy flooring across Toronto and the GTA, you have probably seen the same thing everywhere. Beautiful finished floors in photos, price ranges, maybe a list of benefits. What you almost never see is the actual process behind those floors. The specific steps, the equipment, the technical decisions, and the reasons why each one matters for a floor that genuinely holds up in this climate.
That gap exists for a reason. The process is where the real quality difference between contractors lives, and most companies would rather you not look too closely at it. A contractor who skips moisture testing, acid etches instead of diamond grinding, skips the primer, and applies a thin consumer-grade product can produce a floor that looks identical to a professionally installed system on day one. The difference shows up in year two when the GTA climate has had time to work on both.
At SurfacePro Epoxy Flooring, our process is something we are proud to explain in full detail. We have been installing professional epoxy floors across Toronto and the GTA since 2017, and the six-step installation process we follow on every project is the reason our floors are backed by a 10 year warranty, the reason our clients refer us to their neighbours, and the reason the floors we installed in our first years of business are still performing exactly as they were designed to.
I am Sarita Patel, a decorative epoxy flooring designer with SurfacePro Epoxy Flooring. This post is the complete technical walkthrough of our installation process written for Toronto and GTA homeowners who want to understand what they are actually investing in. Read it and then ask every other contractor you speak with whether their process matches what you read here. The answers will tell you everything.
Why the Epoxy Floor Installation Process in Toronto Requires a Climate-Specific Approach
Before walking through the six steps, it is worth being direct about why the installation process matters so specifically in the GTA context. Generic epoxy content written without regional knowledge treats installation as a universal process. It is not.
What the Toronto and GTA Climate Does to an Epoxy Floor Installation Over Time
Toronto and the surrounding GTA communities deal with conditions that put every aspect of an epoxy floor installation under genuine stress on a seasonal basis. The freeze-thaw cycling that moves concrete slabs repeatedly through expansion and contraction from October through April tests the adhesion quality of every coating applied to them. Road salt and brine from GTA roads track into garages throughout the winter and sit in concentrated chemical deposits on any surface not properly sealed and protected. Spring moisture pressure from snowmelt and rising water tables drives delamination from beneath coatings installed without adequate moisture assessment.
These conditions mean that an epoxy floor installation process that produces acceptable results in a warmer, drier climate may fail significantly faster in the GTA. The specific steps in our process that address moisture testing, mechanical surface profiling, primer application, and topcoat specification are all directly influenced by the demands of an Ontario environment. Every decision in the six steps below was made with this climate in mind.
The Professional Epoxy Floor Installation Process Starts Long Before the First Coat Goes Down
One of the most consistent misconceptions Toronto and GTA homeowners have about epoxy flooring is that the installation is primarily about applying the product. In a professional process, the product application is the final act in a sequence of steps where most of the critical work happens before any epoxy is mixed.
The preparation, the testing, the grinding, the repair, and the primer are what determine whether the floor stays bonded to the concrete for 15 years or starts failing within two. The product that goes on top is built on what happened below it, and what happened below it is built on the concrete preparation that preceded everything else.
Understanding this sequence is what allows a knowledgeable homeowner to evaluate contractors accurately, ask the right questions, and protect their investment from the most common failure modes that produce peeling, bubbling, and delamination in Toronto and GTA garage and basement floors.
Step One: Moisture Testing and Diagnosis, the Foundation of the Epoxy Floor Installation Process
The first step in our professional epoxy floor installation process is one that the majority of consumer kits and lower-budget contractors skip entirely, and it is the skipped step most responsible for the epoxy floor failures we are called in to assess and reinstall across the GTA every season.
Why Moisture Testing Comes First in Every Professional Epoxy Installation in Toronto
Concrete is not waterproof. It is a porous material that allows moisture vapor to move through it from the soil beneath, from the surrounding environment, and from the seasonal moisture dynamics of the GTA's climate. That moisture vapor is essentially invisible at the surface but it is present in every concrete slab to some degree, and in a meaningful percentage of Toronto and GTA slabs it is present at levels that will drive epoxy delamination if not properly addressed before installation.
The mechanism is straightforward. When epoxy is applied over concrete with elevated moisture vapor transmission, the moisture trying to move through the slab is blocked by the impermeable coating above it. The pressure builds at the interface between the coating and the concrete. Eventually that pressure overcomes the adhesion of the coating and the floor bubbles, blisters, and delaminates. This process begins immediately after installation and becomes visible within one to three GTA seasonal cycles.
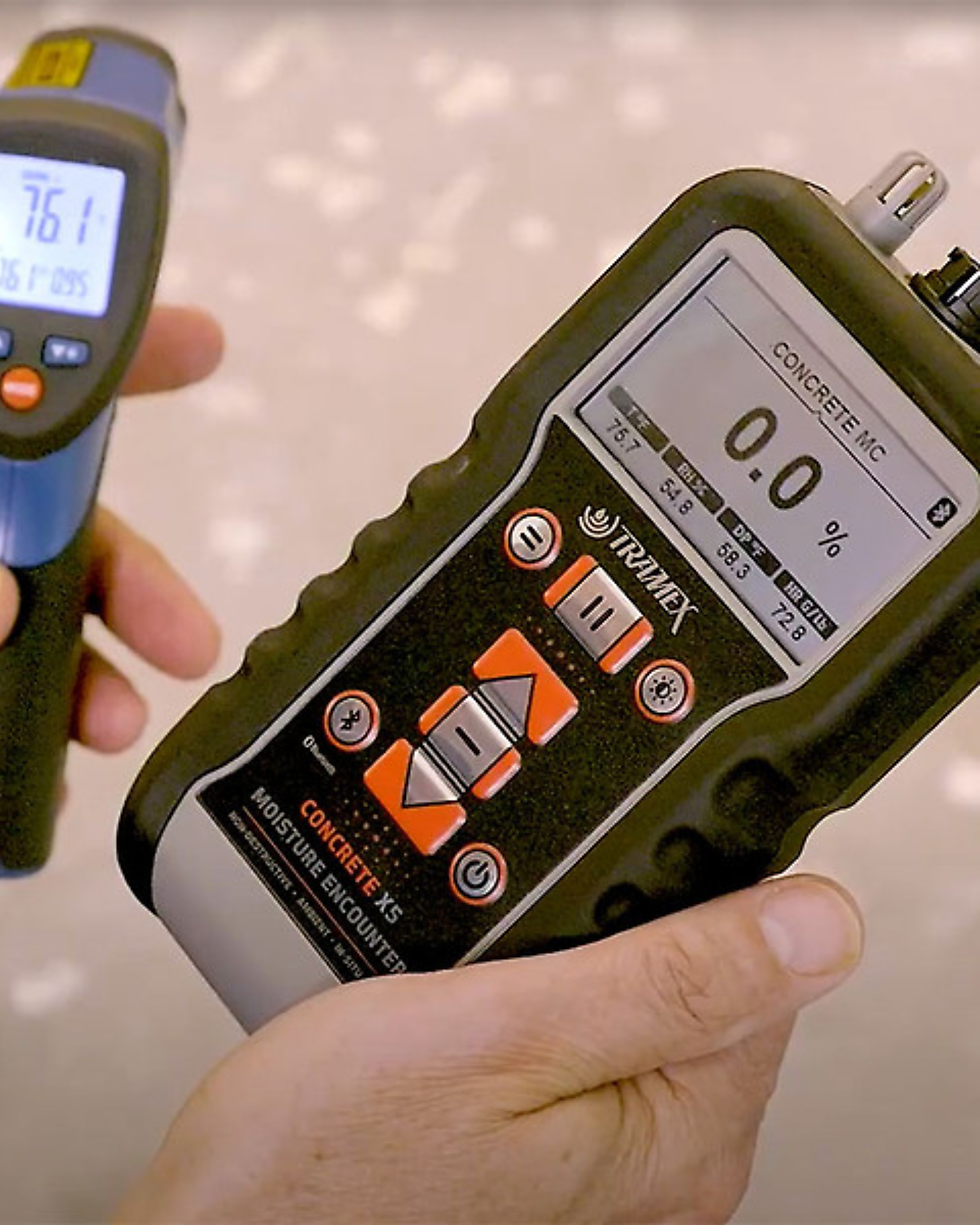
How SurfacePro Epoxy Flooring Performs Moisture Testing as Part of the Installation Process
Our moisture assessment process uses calibrated digital meters to measure the moisture content of the concrete slab at multiple points across the surface. When initial readings indicate elevated moisture levels, we use calcium chloride testing or relative humidity probe testing to generate precise quantitative data on the vapor emission rate of the slab.
These test results directly inform the system specification. When moisture readings fall within the acceptable range for direct epoxy application, the process moves forward to preparation. When readings indicate elevated vapor emission, we specify a moisture-mitigating primer as the foundational layer of the system. This specialized primer chemistry manages moisture movement at the concrete interface and allows the epoxy system above it to bond and cure without the vapor pressure that drives failure.
This diagnostic step is performed on every project we complete across Toronto, North York, Scarborough, Vaughan, Markham, Richmond Hill, Mississauga, Brampton, Ajax, and Pickering. Below-grade basement floors, garage slabs on grade in older Toronto homes, and any slab with a history of moisture-related issues receive extra attention during this phase. The five to ten minutes this step takes before installation is what separates a floor that holds for a decade from one that blisters by the following spring.
Step Two: Diamond Grinding and Surface Repair, the Core of the Professional Epoxy Installation Process
If moisture testing is the diagnostic foundation of our process, diamond grinding is the physical foundation. It is the step that creates the concrete surface condition that everything above it depends on, and it is the step that most clearly separates a professional epoxy floor installation from a consumer or low-budget approach.
Why Diamond Grinding Is Non-Negotiable in the Epoxy Floor Installation Process for Toronto and GTA Garages
Epoxy bonds to concrete through a combination of chemical and mechanical adhesion. The chemical adhesion is determined by the primer and base coat formulation. The mechanical adhesion is determined by the surface profile of the concrete, meaning the microscopic texture that allows the epoxy to grip into the surface rather than simply sitting on top of it.
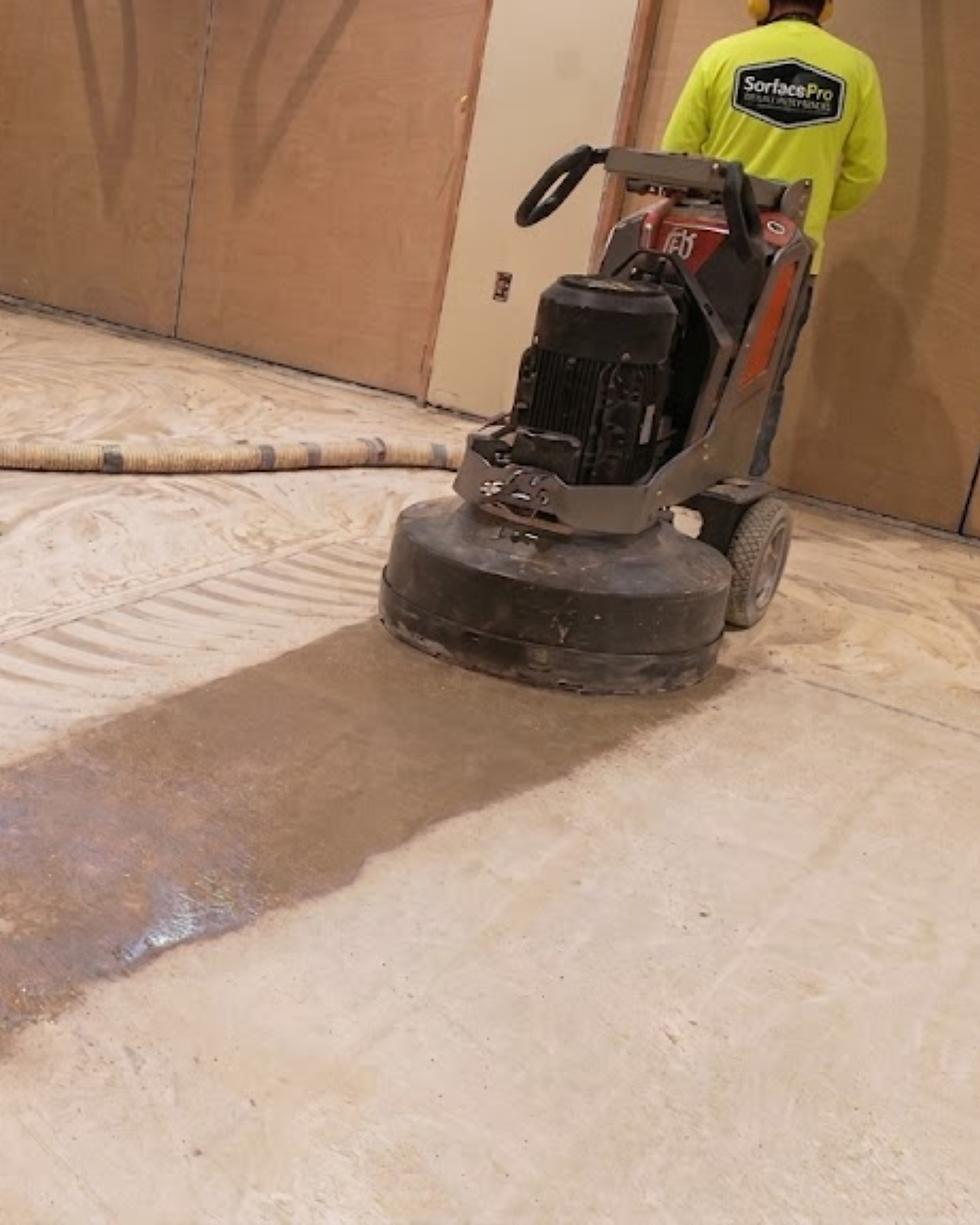
Diamond grinding creates that profile. A commercial planetary diamond grinder, the type of equipment SurfacePro Epoxy Flooring uses on every project, works across the full surface of the concrete floor with industrial diamond tooling that mechanically opens the pores of the slab and creates a consistent surface profile across the entire area. The result is a surface that the epoxy can penetrate and bond into at a level that acid etching or basic cleaning cannot replicate.
The mechanical adhesion difference between a diamond-ground surface and a non-ground surface is substantial, and it is the difference that the GTA's freeze-thaw cycling exposes within a few seasons. A floor on a ground surface distributes the thermal expansion and contraction stress of freeze-thaw cycling across a fully bonded interface. A floor on an unground surface relies on surface contact adhesion that is compromised from the first winter it experiences.
How Our Diamond Grinding Process Works Within the Epoxy Floor Installation Steps
We bring commercial planetary diamond grinders to every Toronto and GTA project. These are not rental equipment tools operated by an inexperienced crew. They are professional-grade machines with the weight, power, and tooling configuration required to create the correct concrete surface profile for a high-performance epoxy installation.
The grinding is performed across the entire floor surface from wall to wall. We take the equipment fully to the edges and work it into corners because the perimeter of the floor is where adhesion failures almost always begin when preparation was not taken completely to the walls. A floor that was ground thoroughly in the center but left undercut at the edges will delaminate from the perimeter inward.
Throughout the grinding process, a commercial vacuum runs continuously alongside the equipment managing the concrete dust that the grinding generates. After the grinding pass is complete, the entire surface is vacuumed thoroughly before any visual or physical inspection takes place.
Surface Repair as Part of the Professional Epoxy Installation Process
While the diamond grinding is performed, our team identifies and marks every crack, pit, spall, and surface irregularity across the floor. Once the grinding pass is complete, each one of these is addressed specifically before the primer goes down.
Cracks are chased with a grinder or oscillating tool to create clean, defined edges for the filler material to bond to. They are then filled with an appropriate polyurea crack filler or patching compound depending on the width, depth, and nature of the crack. Active cracks that have shown movement are treated with a flexible filler that accommodates continued movement without transferring stress into the epoxy above it. Structural spalls and surface pitting are filled with a rapid-setting patching compound and feathered smooth to create a level surface.
This repair work is not cosmetic. It is structural. A crack that is coated over without repair telegraphs visibly through the finished floor and continues to stress the coating above it with every thermal cycle. A properly filled crack creates a stable surface that the epoxy bridges cleanly and that does not generate stress concentrations under the coating.

Step Three: Deep-Penetrating Primer Coat, the Anchor of the Epoxy Floor Installation Process
The primer coat is the layer that connects the prepared concrete to the epoxy system above it. It is invisible in the finished floor. It adds cost and time to the installation. And it is one of the most important steps in the entire process for the long-term performance of the finished system.
What the Primer Does in a Professional Epoxy Floor Installation
Raw, diamond-ground concrete is highly porous and absorbent. When a standard epoxy base coat is applied directly to ground concrete without a primer, the concrete pulls the lower-viscosity components of the epoxy into its surface, leaving the upper portion of the applied coat resin-rich and potentially compromised in its adhesion and chemical resistance. The primer addresses this by penetrating the open concrete surface and sealing it from within before the base coat goes down.
The primer we use in our Toronto and GTA installations is a low-viscosity specialized epoxy formulated to penetrate deeply into the concrete pores and create a permanent chemical anchor within the slab itself. Once it cures, it functions as an extension of the concrete rather than a coating sitting on top of it. The base coat that follows bonds to this primed surface rather than to raw concrete, and the adhesion quality of that bond is substantially higher than direct application over unprimed ground concrete.
When moisture testing indicated the need for a moisture-mitigating primer, the moisture-mitigating formulation is used in this step rather than the standard penetrating primer. The moisture-mitigating chemistry creates a barrier at the concrete interface that prevents vapor transmission from reaching the epoxy layers above it, addressing the failure mode that takes out more GTA epoxy floors than any other single factor.
Why Skipping the Primer Shortens the Life of Any Epoxy Floor Installation in the GTA
The primer step adds time and material cost to the installation. For contractors looking to price themselves competitively by cutting every possible cost, it is a tempting step to skip. The visible result on day one is essentially the same whether the primer was applied or not. The long-term result is not.
In a GTA climate that puts thermal and moisture stress on floor installations every year, the adhesion advantage created by proper primer application compounds over time. A floor with a correctly applied primer system ages gracefully because the bond holding it together is as strong as the installation process can create. A floor without a primer degrades its adhesion incrementally over successive seasons until it reaches the threshold where delamination begins.
That threshold arrives years earlier on an unprimed floor than on a correctly primed one, and it is the explanation for a significant percentage of the failed installations across Toronto and the GTA that we are called in to assess and reinstall.
Step Four: Heavy-Duty Base Coat and Full Flake Broadcast, the Visual and Structural Core of the Process
This is the step that most homeowners recognize as the primary installation phase, and it is where the design identity of the floor takes shape. It is also where a significant amount of the structural performance of the finished system is built.
The Base Coat in the Professional Epoxy Floor Installation Process
The base coat in our system is a high-solids, thick-build epoxy formulation applied at the correct film thickness and spread rate across the primed surface. This is not a thin film. It is the structural core of the floor system, building real film thickness that contributes to the overall performance of the installed coating.
The base coat is pigmented to coordinate with the flake blend selected for the installation. This matters because the base color is visible between the flake chips at certain broadcast densities and contributes to the overall tone and character of the finished floor. Our team calculates the exact quantity of material needed for the specified coverage rate and mixes it precisely to ensure consistent color and viscosity across the entire application.
The base coat is applied using a combination of squeegee and roller technique to ensure even coverage and consistent film thickness across the full surface including edges and transitions. The working window of a high-solids epoxy system is limited after mixing, and our experienced team manages the workflow to maintain consistent coverage across the full area within that window.
Full Flake Broadcast to Rejection, What It Means and Why It Matters in the Installation Process
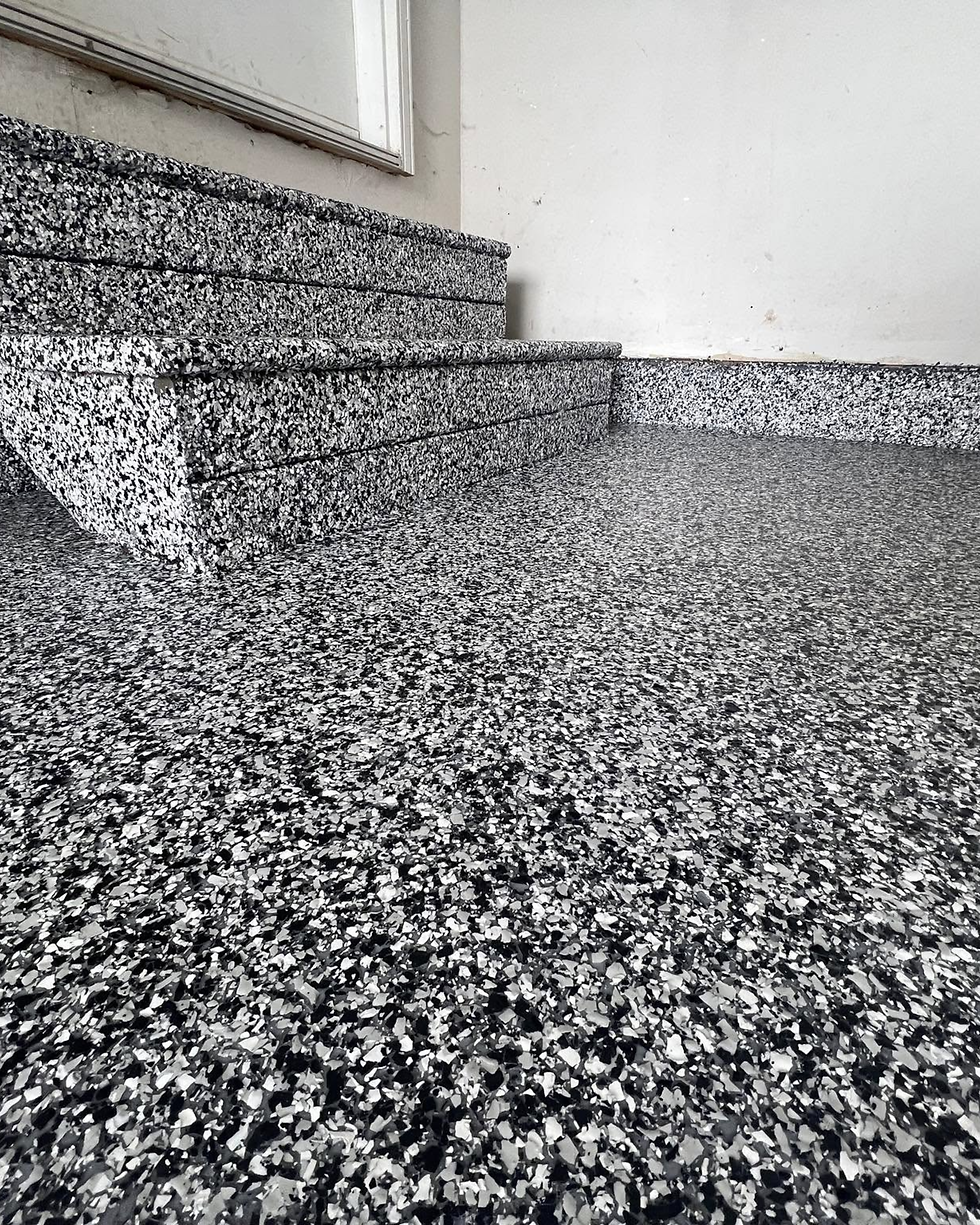
Immediately after the base coat is applied while it is completely wet, our crew broadcasts premium decorative vinyl flake across the entire surface. The term full broadcast to rejection describes the specific technique and density of this application.
Broadcasting to rejection means flake is thrown across the surface until the base coat underneath it is fully covered and additional flake cannot bond to the surface because every available wet area is already occupied. This full coverage broadcast creates a floor that has complete flake coverage with no visible gaps back to the base coat, maximum physical texture across the entire surface, and a structural layer of embedded material that adds impact resistance and depth to the overall system.
The flake layer is not purely decorative, although it is visually striking in the color blends our clients choose. The embedded flake creates physical texture that adds grip to the surface underfoot and provides a degree of impact resistance as the rigid vinyl chips distribute point loading across the surface rather than concentrating it in the epoxy film.
The color blend choices available in our flake library are extensive. Classic granite-look grey and black combinations that suit most GTA garage environments naturally. Warm earth tones in sand, tan, and brown blends. Cool charcoal and silver combinations.
Custom blends developed to complement specific home exterior or interior palettes. We bring physical samples to every free estimate appointment so Toronto and GTA clients can see exactly how each option looks on their actual concrete under their actual lighting before any decision is made.

Step Five: Next-Day Scrape and Clean, the Step That Separates a Good Floor From a Great One
This step is the one that homeowners most frequently tell us they did not expect and that most clearly demonstrates why patience and professionalism in the epoxy floor installation process produce a different finished result than rushing through the job in a single day.
Why the Overnight Cure Before Scraping Matters in the Epoxy Installation Process
After the base coat and full flake broadcast are complete, the floor is left to cure overnight. This overnight window is not downtime. It is when the base coat and the broadcast flake bond permanently into a solid, unified layer. The flake chips that were broadcast into the wet epoxy are now chemically and physically embedded in the cured system, creating the integral composite layer that gives the floor its depth, texture, and structural character.
Rushing this cure period and proceeding to the topcoat application before the base system has fully cured compromises the interlayer adhesion between the base and the topcoat. It is the kind of shortcut that produces a floor that looks the same on day one but develops separation between layers under the thermal cycling and physical stress of a GTA garage environment. We leave the base to cure overnight on every project because we know what the floor needs to perform the way we warrant it to perform.
The Scrape and Vacuum Process That Creates a Uniform Finished Surface
The following day our crew returns and the first thing they do is go over the entire cured surface with professional wide-blade floor scrapers. The overnight cure leaves the surface with texture. Flake chips that landed at angles stand slightly above the plane of the surface. Edges of embedded chips are sharp. The overall texture, while visually appealing, is not yet the uniform, comfortable underfoot surface that the finished floor needs to be.
The scraping process physically knocks down every irregular, upright, or loose flake across the full surface. A professional scraper operated correctly removes the high points and creates a flat, consistent plane across the entire floor from wall to wall. This process is physically demanding and time-consuming. It is also essential to the quality of the finished surface.
After scraping, the entire floor is vacuumed using industrial dust extractors that pick up every piece of loose material, every scraped particle, and every fine particle that the grinding and scraping processes have generated. The vacuuming is thorough and complete before any topcoat is applied because any loose material trapped under the topcoat creates a surface defect visible in the finished floor.
The result of this step is a surface that is uniform, flat, and comfortable underfoot while retaining the visual depth and texture of the full-broadcast flake system. It is the surface the topcoat bonds to, and its quality directly determines the quality of the finished floor.
Step Six: High-Performance Polyaspartic Topcoat, the Final Step That Completes the Epoxy Floor Installation Process
The polyaspartic topcoat is the layer that completes the professional epoxy floor installation process and delivers the surface performance that the entire system beneath it is designed to support. It is the layer that every boot, every tire, every mop, and every spill contacts for the life of the floor. It determines the sheen, the traction, the UV stability, the chemical resistance, and the overall durability of the finished installation.
Why Polyaspartic Is the Right Topcoat for the Epoxy Floor Installation Process in Toronto and the GTA
Polyaspartic is an aliphatic polyurea-based coating developed specifically for applications that demand high performance across a wide range of conditions. For Toronto and GTA garage floors dealing with road salt chemistry, UV exposure through windows and glass panel doors, hot tire contact in summer, and the freeze-thaw temperature cycling of an Ontario season, polyaspartic delivers on every dimension that matters.
UV stability is one of the most important performance characteristics of polyaspartic for GTA applications. Standard epoxy resins are not UV stable. Under exposure to sunlight, they undergo a chemical degradation process called ambering that causes the floor to yellow and discolor over time. In a Toronto or GTA garage that receives any meaningful sunlight exposure, this yellowing can become noticeable within the first few years and significantly changes the appearance of the floor.
Polyaspartic does not amber. It is formulated with UV-stable chemistry that maintains its color and clarity under sustained sun exposure throughout its service life. For any GTA garage floor, this is not an optional feature. It is the specification that protects the long-term appearance of the installation.
Abrasion resistance is the second critical performance characteristic. A polyaspartic topcoat cures to a significantly harder surface than standard epoxy topcoat alternatives. This hardness resists the surface scratching and wear that daily garage use, vehicle traffic, and the grit and gravel tracked in from GTA roads generates over time. The anti-scratch performance of a quality polyaspartic topcoat under real residential garage conditions is meaningfully superior to urethane or standard epoxy topcoat alternatives.
Chemical resistance is the third key characteristic. The road salt, vehicle fluids, cleaning products, and other chemicals that a Toronto or GTA garage floor encounters regularly are handled by the polyaspartic topcoat without degrading its chemistry or compromising its seal. The non-porous, chemically resistant surface means these substances sit on top of the floor until they are cleaned up rather than penetrating and attacking the layers beneath.
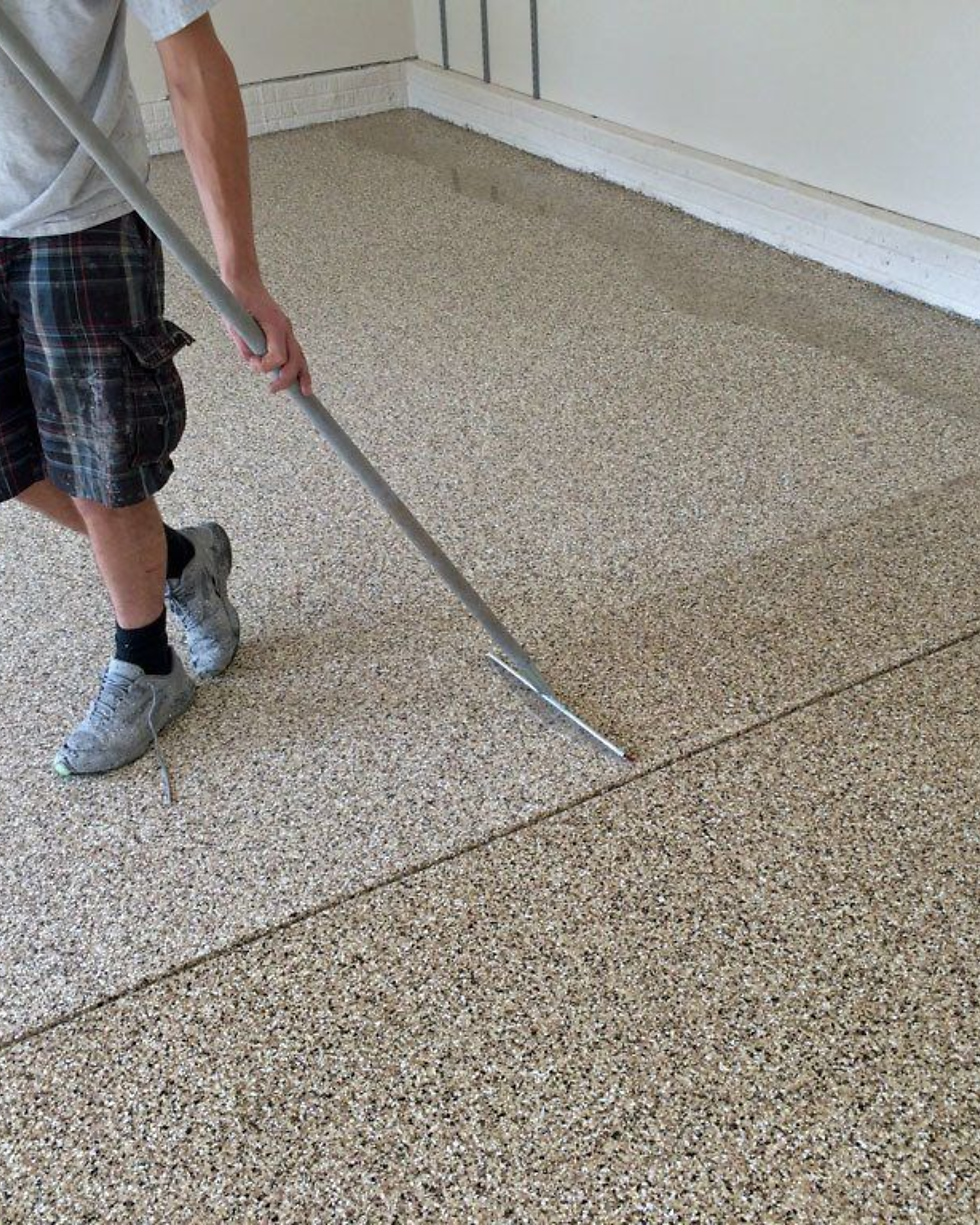
Anti-Slip Aggregate, the Safety Component of Our Epoxy Floor Installation Process
Every polyaspartic topcoat we apply across Toronto and the GTA is infused with premium silica sand aggregate before application. This anti-slip additive is broadcast into the topcoat at a specified density that creates a surface texture providing meaningful traction underfoot in wet and dry conditions without changing the visual appearance of the floor from a standing height.
This is not an optional feature in our installation process. It is standard on every garage floor we install because the wet conditions that Toronto and GTA garages deal with from November through April, from rain, snow, tracked-in slush, and vehicle drip, make anti-slip performance a genuine safety requirement. A high-gloss floor without an anti-slip additive in these conditions is a slip hazard that no professional installation should produce.
The silica aggregate used in our topcoat is sized and distributed to create consistent traction across the full surface without creating a texture that is uncomfortable underfoot or that collects grime in a way that makes the floor harder to maintain. The surface feels clean and polished when dry and provides reliable grip when wet.
What the Finished Polyaspartic Topcoat Delivers for Toronto and GTA Homeowners
When the polyaspartic topcoat cures, the floor is complete. The full six-step process has produced a surface that is visually stunning, chemically sealed, UV stable, abrasion resistant, slip-resistant, and bonded to the concrete below it through a system that addresses every failure mode that the GTA climate presents.
The cure timeline from this final coat is straightforward. Light foot traffic is possible within 24 hours. Full vehicle traffic is appropriate within 72 hours under standard temperature and humidity conditions. We communicate this timeline clearly with every Toronto and GTA client so there are no surprises about when the garage can be returned to use.
What Makes the SurfacePro Epoxy Floor Installation Process Different From Every Other Option in Toronto and the GTA
Every step in the process above is standard for every project we complete. Not standard for projects above a certain price point. Not standard when the concrete is in good condition. Standard for every project, every time, without exception.
The Professional Epoxy Installation Process We Follow Supports a 10 Year Warranty
We back every residential garage installation with a 10 year written warranty on the adhesion and integrity of the installed system. That warranty is possible because of this process. Moisture testing that prevents vapor-driven delamination. Diamond grinding that creates the mechanical adhesion foundation the floor is built on. Primer application that anchors the system into the concrete from within. A high-solids base coat applied at the correct thickness. An overnight cure before topcoat application. A polyaspartic topcoat with UV stability, anti-slip aggregate, and the chemical and abrasion resistance that a GTA garage demands.
Every step earns the warranty. No step is optional and no step is skipped.
The Six-Step Epoxy Installation Process Applied Across Every GTA Community We Serve
We apply this identical six-step installation process on every project we complete across Toronto, North York, Scarborough, Etobicoke, Markham, Vaughan, Richmond Hill, Mississauga, Brampton, Ajax, Pickering, Woodbridge, Maple, and every other community in the GTA. The concrete conditions vary from project to project. The system specification is adjusted based on what the moisture testing and surface assessment reveals. The six-step process itself does not vary because the quality standard it produces does not vary.
When you hire SurfacePro Epoxy Flooring for your Toronto or GTA project, you are hiring the process as much as the product. The preparation, the testing, the grinding, the repair, the primer, the base coat, the overnight cure, the scrape and vacuum, and the polyaspartic topcoat are all included because all of them are what the finished floor and the warranty behind it require.
Frequently Asked Questions
What is the epoxy floor installation process used by professional contractors in Toronto?
A professional epoxy floor installation process in Toronto involves six core steps: digital moisture testing of the concrete slab, diamond grinding and surface repair to create proper adhesion profile, application of a deep-penetrating primer coat, application of a thick high-solids base coat with full flake broadcast, an overnight cure followed by a next-day scrape and industrial vacuum, and application of a 100% UV-stable polyaspartic topcoat with anti-slip aggregate. This is the process SurfacePro Epoxy Flooring follows on every project across Toronto and the GTA.
How long does the professional epoxy floor installation process take in the GTA?
The complete professional epoxy floor installation process at SurfacePro Epoxy Flooring takes two days for a standard residential garage across Toronto and the GTA. Day one covers moisture testing, diamond grinding, surface repair, and primer application. Day two covers the base coat, flake broadcast, overnight cure, next-day scrape and vacuum, and polyaspartic topcoat. Light foot traffic is typically possible within 24 hours of the final coat and full vehicle traffic within 72 hours.
Why does the professional epoxy installation process include an overnight cure before the topcoat?
The overnight cure between the base coat application and the polyaspartic topcoat allows the base coat and broadcast flake to bond permanently into a solid unified layer before the topcoat goes down. Applying the topcoat before this cure is complete compromises the interlayer adhesion between the two systems. It is the patience investment in the process that produces the long-term performance the 10 year warranty is built on.
What is the difference between diamond grinding and acid etching in the epoxy floor installation process?
Diamond grinding mechanically opens the pores of the concrete and creates a physical surface profile that the epoxy bonds into at a mechanical level. Acid etching chemically etches the surface but does not create the same mechanical profile or adhesion quality. In the Toronto and GTA context where freeze-thaw cycling puts sustained stress on floor adhesion every year, the mechanical bond created by diamond grinding is the correct preparation method and the one that supports a long-term warranty.
Does the epoxy floor installation process differ for basement floors compared to garage floors in Toronto?
The six-step process is the same for both applications. The primary difference is that basement floors in Toronto and the GTA typically require more attention during the moisture testing phase because below-grade concrete experiences greater seasonal moisture pressure than garage slabs on grade. The moisture assessment findings may result in a moisture-mitigating primer specification for basement installations more frequently than for garage floors. The surface repair scope may also differ based on the specific concrete condition of the basement slab.
How do I know if a contractor is following a professional epoxy floor installation process in Toronto or the GTA?
Ask specifically about each step. A professional contractor will describe moisture testing using calibrated equipment, diamond grinding using commercial planetary grinders, crack and spall repair before primer application, a dedicated primer coat, a high-solids base coat with full flake broadcast, an overnight cure before the scrape and topcoat, and a polyaspartic topcoat with anti-slip aggregate. Any contractor who cannot describe these steps in detail or who describes a significantly abbreviated process is not following the installation standard that produces a floor warranted for the long term in a GTA climate.
See This Process in Action on Your Own Floor. Book Your Free Estimate Today.
Now you know exactly what a professional epoxy floor installation process looks like from the first moisture reading to the final polyaspartic coat. Every step has a reason. Every reason is backed by nearly a decade of installing floors in Toronto and the GTA and watching what the Ontario climate does to floors installed with this process versus floors installed without it.
SurfacePro Epoxy Flooring applies this complete six-step process to every project we complete across Toronto, North York, Scarborough, Markham, Vaughan, Richmond Hill, Mississauga, Brampton, Ajax, Pickering, and the entire GTA. Every project starts with a free on-site estimate. Every residential garage installation is backed by our 10 year written warranty. Every quote is detailed, honest, and firm.
Call or text us today. We will come to your home, assess your concrete, walk you through your design options with physical samples, and show you exactly what this process delivers for your specific floor.
Call or Text: (437) 477-7366 WhatsApp: (437) 477-7366 Email: hello@thecdg.ca Website: www.surfaceproepoxy.ca
Areas We Serve: Markham, Toronto, Vaughan, Richmond Hill, Ajax, Pickering, Scarborough, Mississauga, Brampton, and the Entire GTA, Ontario
About SurfacePro Epoxy Flooring
Established in 2017, SurfacePro Epoxy Flooring is a trusted leader in professional epoxy flooring solutions across the Greater Toronto Area. With nearly a decade of industry experience, our team of certified flooring specialists delivers superior craftsmanship, lasting results, and exceptional service on every project, from residential garages and basements to commercial facilities and industrial spaces.
Our Services Include:
Garage Floor Coatings
Metallic Epoxy Flooring
Commercial and Industrial Coatings
Decorative Epoxy Finishes
And much more
SurfacePro Epoxy Flooring — Built on Quality. Trusted Since 2017.
Last Updated: April 2026 | Published by SurfacePro Epoxy Flooring Written by: Sarita Patel, Decorative Epoxy Flooring Designer | Sarita.p@thecdg.ca
Recommended Resources
Learn more about epoxy flooring options and our services:


Comments